23:21

Cheesecake de chocolate / Chocolate cheesecake

Cheesecake de chocolate / Chocolate cheesecake
Há meses que o meu filho me pedia um cheesecake. O problema é que ainda não encontrei aquela receita que me inspira. Então decidi eu fazer a minha com o que havia no frigorífico e com o resto de uma tablete de chocolate que aqui andava enjoada!
Confesso que nunca pensei que fosse resultar tão bem! Demorou mais tempo do que esperava a cozer, mas acabou por ficar perfeito! Com um sabor a chocolate delicioso, uma textura sedosa e muito leve.

For months my son has asked me for a cheesecake. The problem is that I have not found the one recipe that inspires me. So I decided to make my own with what I had in the fridge and the rest of a chocolate bar that was forgotten in the pantry!
I confess I never thought it would work so well! It took longer than expected to bake, but eventually it was perfect! With a delicious chocolate flavor, a silky texture and very light.


CHEESECAKE DE CHOCOLATE

Tempo de preparação: 3h
Dificuldade: Fácil
Vegetariano: Sim
Apto para crianças
Ingrediente principal: Bolacha torrada, Chocolate, Mascarpone
Para 8 pessoas
Prato: Sobremesa

Tipo de cozinha: Pastelaria

Ingredientes:
1 embalagem de 250g de mascarpone
100g de chocolate em barra
3 ovos XL
1 colher de chá de baunilha
200ml de natas para bater
90g de açúcar em pó
40g de farinha
1 colher de café de bicarbonato de sódio
250g de bolacha torrada
125g de manteiga à temperatura ambiente

Untar e forrar com papel vegetal uma forma de cheesecake.
Moer as bolachas de forma a ficarem alguns pedaços e misturar bem com a manteiga. Forrar o fundo da forma com a bolacha e calcar com o fundo de um copo. Levar ao congelador durante uns minutos.
Derreter o chocolate no microondas e reservar.
Numa tigela funda bater os ovos até ficarem espumosos. Juntar o açúcar e bater até se obter uma mistura clara.
Noutra tigela bater o mascarpone com as natas e a baunilha. Juntar o chocolate e mexer rapidamente. Adicionar gradualmente os ovos à mistura de queijo. Mexer cuidadosamente para os ovos não perderem o ar. Peneirar a farinha e o bicarbonato de sódio e envolver.
Retirar a base do congelador, cobrir com o creme de chocolate e levar a forno pré-aquecido durante cerca de 1 hora.
Deixar arrefecer durante 20 minutos e depois desenformar e levar ao frigorífico até arrefecer completamente.


CHOCOLATE CHEESECAKE

Preparation time : 3h
Difficulty : Easy
Vegetarian: Yes
Suitable for children
Main Ingredient : Toasted biscuits, Chocolate, Mascarpone
For 8 people
Course : Dessert


Ingredients:
250g mascarpone
100g chocolate bar
3 eggs XL
1 teaspoon vanilla
200ml whipping cream
90g icing sugar
40g flour
1/4 teaspoon baking soda
250g toasted tea biscuits
125g of butter at room temperature

Grease and line with parchment paper a cheesecake pan.
Grind the biscuits and mix well with the butter. Line the bottom of the pan with the cookie mixture and press down with the bottom of a glass. Place in the freezer for a few minutes .
Melt the chocolate in the microwave and set aside.
In a deep bowl beat the eggs until they are foamy. Add sugar and beat until you get a pale mixture .
In another bowl beat the mascarpone with the cream and vanilla. Add the chocolate and stir quickly. Gradually add the eggs to the cheese mixture. Stir carefully so the eggs do not lose air in it. Sift the flour and baking soda and mix carefully .
Remove the cheesecake pan of the freezer and pour the chocolate cream and bake in a preheated oven for about 1 hour.
Allow to cool for 20 minutes, then unmold and refrigerate until completely cool .


13:12

Pão integral de mel e canela / Honey and cinnamon whole wheat bread

Pão integral de mel e canela / Honey and cinnamon whole wheat bread
Este pão foi uma surpresa, pois saiu tão melhor do que eu esperava. Fofinho, leve e delicioso! Simples, com doce ou manteiga, fica uma delícia! 
Eu queria tirar uma foto dele inteiro, mas o cheiro atraiu os meus filhos que, num abrir e fechar de olhos comeram logo 4 fatias.
Com este pão delicioso, participo pela primeira vez no World Bread Day. Estou curiosa por ver todos os outros pães feitos no âmbito desta iniciativa que já vai no 8º ano!
Ao longo dos séculos, a produção e o consumo de pão modificaram as condições de vida do Homem, permitindo um maior aporte de hidratos de carbono. As técnicas de panificação foram evoluindo e foram, sobretudo os gregos, que criaram diferentes variedades de pão, graças à adição de especiarias, aromas, leite e mel.
O cereal mais utilizado na cofecção do pão é, sem sombra de dúvida, o trigo. É a esta farinha que se juntam farinhas de outros cereais e, assim se obtêm os mais variadíssimos pães.
Espero que gostem deste pão e divirtam-se a fazer pão!

World Bread Day 2013 - 8th edition! Bake loaf of bread on October 16 and blog about it!

This bread was a surprise because it came out so much better than I expected. Fluffy, light and delicious! Plain, with jam or butter, this bread is a delight!
I wanted to take a picture of it whole, but the smell attracted my children who, in the twinkling of an eye, just ate 4 slices.
With this delicious bread, I participate for the first time in the World Bread Day. I'm curious to see all the other breads made under this initiative which is now in its 8th year!
Over the centuries, the production and consumption of bread changed the conditions of Mankind, allowing greater intake of carbohydrates. The baking techniques evolved and were mainly the Greeks, who created different varieties of bread, thanks to the addition of spices, flavorings, milk and honey.
The cereal most commonly used in the confection of bread is, without a doubt, the wheat. By adding flour of other cereals, we obtain so many kinds of breads.
Hope you enjoy this bread and have fun baking!


PÃO INTEGRAL DE MEL E CANELA

Tempo de preparação: 2h 15m
Dificuldade: Médio
Vegetariano: Sim
Apto para crianças
Ingrediente principal: Mel, Canela e Farinha Integral
Rende 1 pão
Prato: Pão
Tipo de cozinha: Panificação

Ingredientes
1 1/2 copo de farinha integral
cerca de 2 copos de farinha sem fermento
2 colheres de sopa de mel
1 copo de água tépida
1 colher de sopa de manteiga
1 colher de chá de canela
1 colher de chá de flor de sal com pólen
25g de fermento fresco

Numa tigela de batedeira dissolver a levedura com a água. Juntar o mel, a manteiga, o sal e a canela. Adicionar a farinha integral e amassar até ficar tudo bem misturado.
Sem parar de amassar, ir adicionando a farinha sem fermento até se obter uma massa elástica e macia que não se cola às mãos. Eu adicionei cerca de 2 copos de farinha. Esta quantidade pode variar consoante o tipo que farinha e água que usem.
Colocar num alguidar polvilhado com farinha, tapar com um pano e deixar levedar durante 1 hora.
Untar uma forma de bolo inglês com azeite e farinha.
Numa superfície enfarinhada, amassar rapidamente a massa, formando uma bola. Estender a massa e enrolar como se fosse uma torta, tendo em atenção o tamanho da forma. Colocar a massa dentro da forma, tapar e deixar levedar durante 30 minutos.
Pré-aquecer o forno a 180ºC.
Levar ao forno durante cerca de 40 minutos, ou até ficar se bater com o dedo e fazer um som oco.


HONEY AND CINNAMON WHOLE WHEAT BREAD

Preparation time : 2h 15m
Difficulty: Medium
Vegetarian: Yes
Suitable for children
Main Ingredient: Honey , Cinnamon and Whole wheat flour
Makes 1 loaf
Dish : Bread
Type of cuisine: Bakery

Ingredients
1 1/2 cup flour
about 2 cups plain flour
2 tablespoons honey
1 cup warm water
1 tablespoon of butter
1 teaspoon cinnamon
1 teaspoon Fleur de sal with pollen
25g fresh yeast

In a mixer bowl dissolve the yeast with the water. Add the honey, butter, salt and cinnamon. Add the whole wheat flour and mix.
Without stopping the kneading, add the plain flour to obtain a soft and elastic dough that does not stick to your hands. I added about 2 cups flour. This amount can vary depending on the type of flour and water you use .
Place in a bowl dusted with flour, cover with a cloth and let rise for 1 hour .
Grease a bread pan with olive oil and flour.
On a floured surface, quickly knead the dough into a ball. Roll out the dough and roll like a log, taking into account the size of the bread pan. Place the dough into the bread pan, cover and let rise for 30 minutes .
Preheat oven to 180º C.
Bake for about 40 minutes, or until it makes a hollow sound when you hit it with your hand.


14:48

Bolachas recheadas com Nutella / Cookies with Nutella Filling

Bolachas recheadas com Nutella / Cookies with Nutella Filling
Ontem viram aqui no blog aquelas bolachas deliciosas com recheio de figo. Para quem é mais guloso/a aqui fica uma sugestão que fez imenso sucesso aqui em casa. É impossível falhar quando se recheia uma bolacha com Nuttela! Ora vejam!

Yesterday you saw here on the blog some delicious cookies filled with fig. For the ones with a sweeter tooth here's a suggestion that made a huge success here at home. It is impossible to fail when using Nuttela and cookies! Take a look!


BOLACHAS RECHEADAS COM NUTTELA

Tempo de preparação: 35 minutos
Dificuldade: Médio
Vegetariano: Sim
Apto para crianças
Ingrediente principal: Nuttela
Rende 20 bolachas
Prato: Bolachas
Tipo de cozinha: Pastelaria

Ingredientes:
6 colheres de sopa de manteiga à temperatura ambiente
1/2 copo de açúcar
1 ovo
1 colher de chá de extracto de baunilha
1 1/2 copo de farinha integral (pode ser preciso adicionar mais)
Nutella qb

Pré-aquecer o forno a 180ºC e forrar 2 tabuleiros com papel vegetal.
Na tigela da batedeira, bater a manteiga com o açúcar até se obter uma mistura fofa. Adicionar o ovo e a baunilha e bater novamente até ficar bem incorporado. Juntar a farinha e amassar até se obter uma bola de massa que não se agarre às mãos. Pode ser necessário juntar mais farinha do que a indicada na receita.
Polvilhar a bancada de trabalho com farinha e estender a massa, colocar uma colher de chá de Nutella e dobrar a massa sobre a pasta de chocolate. Cortar com a forma que se quiser. Eu use uma caixa plástica rectangular, para dar este formato às bolachas. Repetir este procedimento até não haver massa.
Vai ao forno durante 15 minutos ou até ficarem douradas. Retirar do tabuleiro e deixar arrefecer numa rede. Guardar num recipiente hermético.


COOKIES WITH NUTELLA FILLING

Preparation time: 35 minutes
Difficulty: Medium
Vegetarian: Yes
Suitable for children
Main Ingredient: Nutella
Makes 20 cookies
Type of cuisine : Pastry

Ingredients:
6 tablespoons butter at room temperature
1/2 cup of sugar
1 egg
1 teaspoon vanilla extract
1 1/2 cup whole wheat flour (you may need to add more )
Nutella

Preheat oven to 180 º C and line 2 trays with baking paper.
In the bowl of an electric mixer, mix the butter with the sugar until the mixture is fluffy. Add the egg and vanilla and mix again until well incorporated. Add flour and mix until you get a dough ball that doesn't stick to your hands. You may need to add extra flour than indicated in the recipe.
Sprinkle work surface with flour and stretch the dough, put a teaspoon of Nutella and fold the dough over the chocolate. Cut using the the shape that you want. I used a rectangular plastic box to give this  square format to the cookies. Repeat this procedure until you have no more dough.
Bake for 15 minutes or until golden. Remove from pan and cool on a rack. Store in airtight container.


10:28

Bolachas recheadas com figo / Fig stuffed cookies

Bolachas recheadas com figo / Fig stuffed cookies
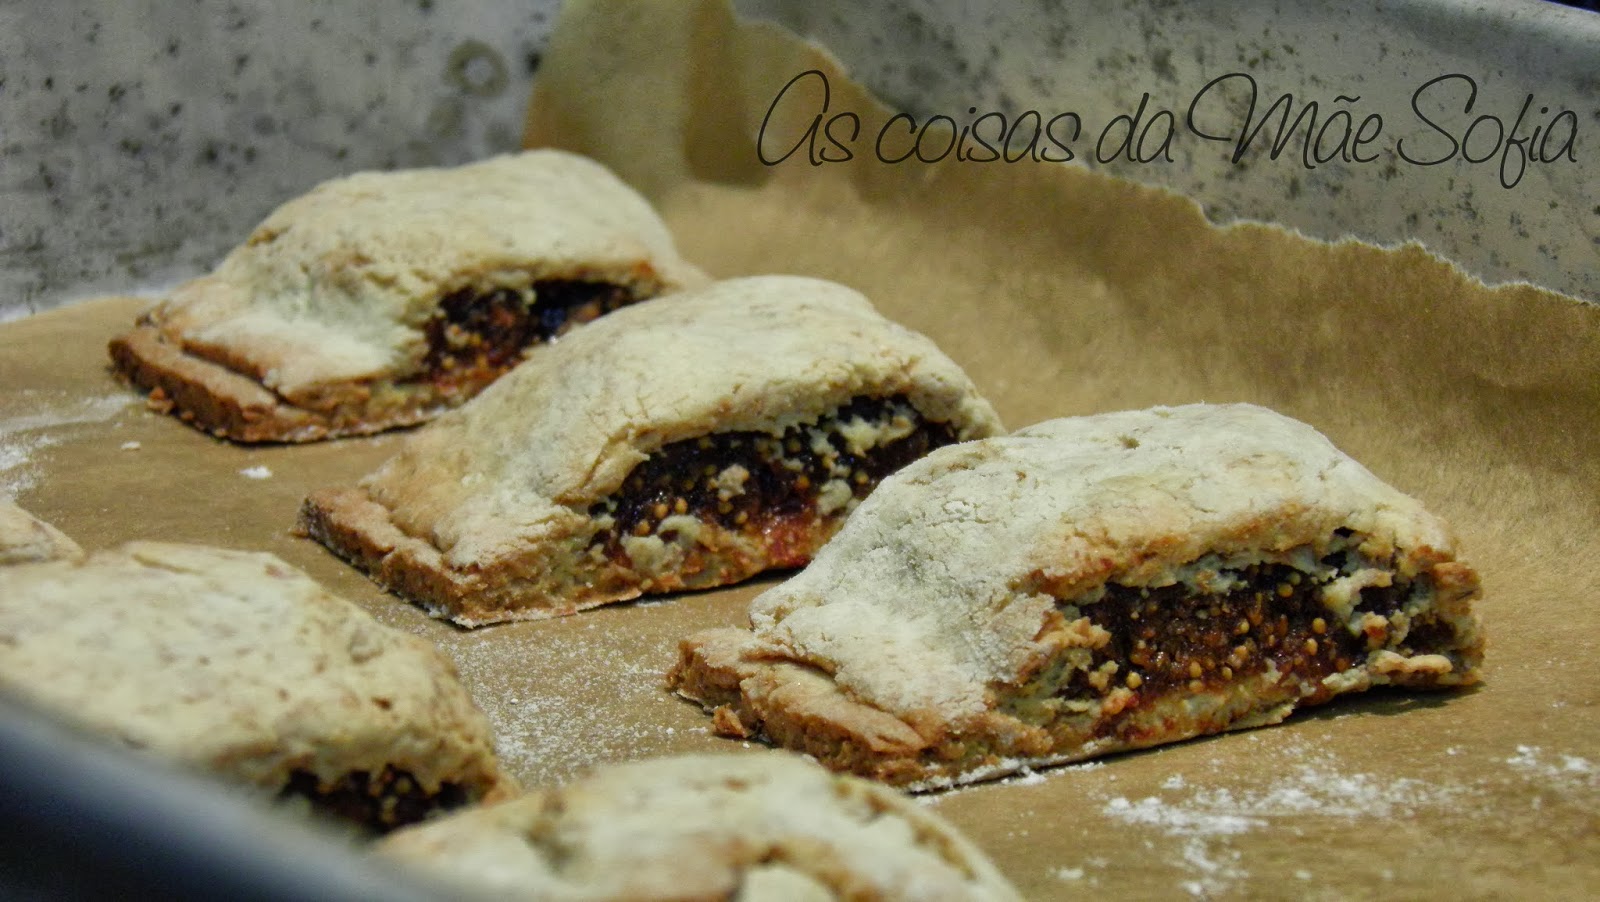
Eu adoro figos e também adoro aquelas barrinhas recheadas com figo que se vendem nos supermercados. Mas voltamos sempre ao mesmo problema dos aditivos, dos açúcares e gorduras em excesso, já para não falar do preço exorbitante que pedem por elas!
Depois de tentar várias receitas, esta foi a que mais me agradou e agradou também as pequenas bocas cá de casa. Com chá, leite ou sem nada são ideais para um mini-lanche delicioso!

I love figs and also love those bars stuffed with figs that are sold in supermarkets. But we always come back to the same problem: additives, sugars and excess fats, not to mention the price!
After trying several recipes, this was the one that pleased me and the little ones the most. With tea, milk or alone, are ideal for a delicious snack!


BOLACHAS RECHEADAS COM FIGOS
Fonte: Weelicious.com

Tempo de preparação: 35 minutos
Dificuldade: Médio
Vegetariano: Sim
Apto para crianças
Ingrediente principal: Figos, Farinha Integral
Rende 20 bolachas
Prato: Bolachas
Tipo de cozinha: Pastelaria

Ingredientes:
1 copo de figos
1 colher de sopa de mel
6 colheres de sopa de manteiga à temperatura ambiente
1/2 copo de açúcar
1 ovo
1 colher de chá de extracto de baunilha
1 1/2 copo de farinha integral (pode ser preciso adicionar mais)

Pré-aquecer o forno a 180ºC e forrar 2 tabuleiros com papel vegetal.
Colocar os figos de molho em água quente durante 15 minutos. Depois do tempo passado, escorrer os figos, reservando 1 colher de sopa da água. Num copo fundo triturar os figos com o mel e a água.
Na tigela da batedeira, bater a manteiga com o açúcar até se obter uma mistura fofa. Adicionar o ovo e a baunilha e bater novamente até ficar bem incorporado. Juntar a farinha e amassar até se obter uma bola de massa que não se agarre às mãos. Pode ser necessário juntar mais farinha do que a indicada na receita.
Polvilhar a bancada de trabalho com farinha e estender metade da massa na forma de rectângulo e espalhar o recheio de figos como se vê na fotografia.


De seguida dobra-se a massa sobre si de forma a cobrir o recheio e pressionam-se as extremidades. Com uma faca cortam-se em rectângulos iguais. Vai ao forno durante 15 minutos ou até ficarem douradas. Retirar do tabuleiro e deixar arrefecer numa rede. Guardar num recipiente hermético.


FIG STUFFED COOKIES
Source: Weelicious.com

Preparation time: 35 minutes
Difficulty: Medium
Vegetarian: Yes
Suitable for children
Main Ingredient: Figs , Whole wheat Flour
Makes 20 cookies
Type of cuisine : Pastry

Ingredients:
1 cup of figs
1 tablespoon of honey
6 tablespoons butter at room temperature
1/2 cup of sugar
1 egg
1 teaspoon vanilla extract
1 1/2 cup whole wheat flour (you may need to add more )

Preheat oven to 180 º C and line 2 trays with baking paper .
Soak the figs in hot water for 15 minutes. Drain the figs, reserving 1 tablespoon of water. Blend the figs with honey and the tablespoon of the figs soaking water.
In the bowl of an electric mixer, mix the butter with the sugar until fluffy. Add the egg and vanilla and mix again until well incorporated. Add flour and mix until you get a dough ball. If it sticks to your hands you may need to add more flour.
Sprinkle work surface with flour and spread half the dough into a rectangle and spread the filling of figs as seen in the photograph.


Fold the dough over on top of itself to cover the filling and press the edges. Cut into equal rectangles. Bake for 15 minutes or until golden. Remove from tray and cool on a rack. Store in airtight container .


14:59

Mini frittata de cogumelos e scamorza fumado / Mushrooms and smoked scamorza mini frittata

Mini frittata de cogumelos e scamorza fumado / Mushrooms and smoked scamorza mini frittata
Depois de ver o desafio lançado pelo grupo "Dia um... na cozinha" no Facebook não resisti a fazer uma frittata. Este mês o desafio era criar uma frittata de legumes e como eu adoro cogumelos assim saiu esta frittata individual que estava deliciosa!!


After seeing the challenge launched by the group "Day one... in the kitchen" on Facebook I couldn't resist making a frittata. This month the challenge was to create a vegetable frittata and since I love mushrooms an individual and delicious frittata was created!!


MINI FRITTATA DE COGUMELOS E SCAMORZA FUMADO

Tempo de preparação: 20 minutos
Dificuldade: Fácil
Vegetariano: Sim
Apto para crianças
Ingrediente principal: Cogumelos, Scamorza fumado, Ovos e Leite
Para 1 pessoa
Tipo de cozinha: Cozinha rápida

Ingredientes:
1 colher de chá de azeite
2 colheres de sopa de mistura de cogumelos congelados
1 dentes de alho
1 ovo
2 colheres de sopa de leite magro
1 colher de sopa de queijo Scamorza fumado em cubos
sal e pimenta preta

Pré-aquecer o forno a 180ºC e untar com um pouco de manteiga uma forma individual de souflé ou um ramequin.
Aquecer um frigideira com o azeite e o alho. Adicionar os cogumelos e saltear durante uns minutos. Retirar o alho e temperar com sal e pimenta.
Bater um ovo com o leite, um pouco de sal e pimenta. Verter os cogumelos para a forma untada e cobrir com o ovo batido com leite. Adicionar o queijo Scamorza e levar ao forno durante 13 minutos. Servir com uma salada verde.


MINI FRITTATA OF MUSHROOMS AND SMOKED SCAMORZA

Preparation time: 20 minutes
Difficulty: Easy
Vegetarian: Yes
Suitable for children
Main ingredient: Mushrooms, Smoked Scamorza, Eggs and Milk
1 person
Type of cuisine: Fast Food

Ingredients:
1  teaspoon olive oil
2 tablespoons frozen mushroom mixture
1 garlic clove
1 egg
2 tablespoons skim milk
1 tablespoon diced smoked cheese Scamorza
salt and black pepper

Preheat oven to 180ºC and grease with a little butter a ramequin or an individual souffle tin.
Heat a frying pan with olive oil and garlic. Add the mushrooms and sauté for a few minutes. Remove the garlic and season with salt and pepper.
Mix the egg with the milk, a little salt and pepper. Pour the mushrooms into the tin and cover with the egg and milk misture. Add the cheese and bake for 13 minutes. Serve with a green salad.


20:28

Taças tricolores / Tricolor bowls

Taças tricolores / Tricolor bowls
Já tinha esta receita debaixo de olho há já bastante tempo e, quando hoje vi o convite do blog "Prato Caseiro" para participar no seu passatempo, não resisti e fiz estas taças tricolores! A mistura de sabores é deliciosa e é tão fácil e rápido de fazer.
Experimentem e vão ver como uma sobremesa pode ser linda e saborosa :)

I have been wanting to make this dessert for quite some time, and today when I saw the invitation on the blog "Homemade Dish" to participate in their competition, and didn't resist and made these tricolor bowls! The blend of flavors is delicious and is so easy and quick to make.
Try it and you will see how a dessert can be beautiful and tasty :)


TAÇAS TRICOLORES
Fonte: "As melhores receitas de café", Edições Asa

Tempo de preparação: 15 minutos + 2 horas de refrigeração
Dificuldade: Fácil
Vegetariano: Sim
Apto para crianças
Ingrediente principal: Café, baunilha e cacau
Para 6 pessoas
Prato: Doce
Tipo de cozinha: Sobremesa

Ingredientes:
275g de açúcar em pó
6 colheres de sopa de farinha Maizena
1 litro de leite
3 gemas
75g de manteiga amolecida
1 colher de sopa de café solúvel
1 vagem de baunilha
2 colheres de sopa de cacau em pó sem açúcar

Para a camada de café:

Misturar num tacho 90g de açúcar em pó com 2 colheres de sopa de farinha Maizena, 350ml de leite e 1 gema. Levar ao lume e depois de levantar fervura, deixar engrossar durante 1 minuto sem nunca parar de mexer com uma vara de arames. Retirar do calor e juntar o café e 25g de manteiga. Misturar bem e distribuir pelos 6 copos. Levar ao frio.

Para a camada de baunilha:

Entretanto misturar num tacho 90g de açúcar em pó com 2 colheres de sopa de farinha Maizena, 300ml de leite, as sementes da vagem de baunilha e 1 gema. Levar ao lume e depois de levantar fervura, deixar engrossar durante 1 minuto sem nunca parar de mexer com uma vara de arames. Retirar do calor e juntar  25g de manteiga. Misturar bem e distribuir com cuidado por cima da camada de café. Levar ao frio.

Para a camada de cacau:

Enquanto a segunda camada arrefece um pouco, misturar num tacho 95g de açúcar em pó com 2 colheres de sopa de farinha Maizena, 350ml de leite e 1 gema. Levar ao lume e depois de levantar fervura, deixar engrossar durante 1 minuto sem nunca parar de mexer com uma vara de arames. Retirar do calor e juntar  25g de manteiga e o cacau. Misturar bem e distribuir com cuidado por cima da camada de baunilha, alisando a superfície. Levar ao frio durante 2 horas.


(english version)
TRICOLOR BOWLS
Source: "The best coffee recipes", Edições Asa

Preparation time: 15 minutes + 2 hours of refrigeration
Difficulty: Easy
Vegetarian: Yes
Suitable for children
Main Ingredient: Coffee, vanilla and cocoa
For 6 people
Plate: Dessert
Type of cuisine: Dessert

Ingredients:
275g icing sugar
6 tablespoons cornflour
1 L of milk
3 egg yolks
75g butter, softened
1 tablespoon of instant coffee
1 vanilla pod
2 tablespoons unsweetened cocoa powder

For the layer of coffee:

Mix in a saucepan 90g of powdered sugar with 2 tablespoons of cornflour, 350ml of milk and 1 egg yolk. Bring to the boil and let it thicken for 1 minute without stopping stir with a wisk. Remove from the heat and add the coffee and 25g of butter. Mix well and distribute for 6 cups. Place in the fridge.

For vanilla layer:

Meanwhile in a saucepan mix 90g of powdered sugar with 2 tablespoons of cornflour, 300ml of milk, seeds from vanilla bean and 1 egg yolk. Bring to the boil and let it thicken for 1 minute without stopping to stir with a wisk. Remove from heat and add 25g of butter. Mix well and distribute carefully over the coffee layer. Place in the fridge again.

For the layer of cocoa:

While the second layer cools a bit, mix in a saucepan 95g of powdered sugar with 2 tablespoons of cornflour, 350ml of milk and 1 egg yolk. Bring to the boil and let it thicken for 1 minute without stopping to stir with a wisk. Remove from heat and add 25g of butter and the cocoa. Mix well and distribute carefully over the vanilla layer, smoothing the surface. Place in the fridge for two hours.


17:49

Muffins de 3 chocolates e nozes / 3 chocolate and walnuts muffins

Muffins de 3 chocolates e nozes / 3 chocolate and walnuts muffins
Quando eu penso em celebrações, lembro-me imediatamente de chocolate! Para celebrar o aniversário da Mariana Teixeira, autora do blog "Receitas para a Felicidade" e do livro "Receitas da Felicidade para Robôs de Cozinha", no proximo dia 6 de Outubro, lembrei-me de fazer estes muffins deliciosos de 3 chocolates e nozes. Sim leram bem! 3 chocolates! Só um chocolate é bom, mas a combinação de 3 é fantástica! E todos sabemos como as nozes combinam bem com o chocolate!

Mariana estes muffins são para ti! 

Mariana these muffins are for you!

When I think of celebrations, I immediately remember of chocolate! To celebrate Mariana Teixeira's birthday, author of the blog "Recipes for Happiness" and the book "Recipes for Happiness - Kitchen Robots", next 6th of October, I remembered making these delicious 3 chocolate and walnuts muffins. Yeah read it right! 3 chocolate! Only one chocolate is good, but the combination of 3 is fantastic! And we all know how walnuts combine well with chocolate!


MUFFINS DE 3 CHOCOLATES COM NOZES

Tempo de preparação: 40 minutos

Dificuldade: Fácil
Vegetariano: Sim
Apto para crianças
Ingrediente principal: Chocolate, Nozes
Rende 20 muffins
Prato: Bolos
Tipo de cozinha: Pastelaria

Ingredientes:

2 copos de farinha sem fermento
3/4 copo de farinha integral
1 copo de açúcar amarelo
1/3 copo de cacau em pó sem açúcar
1 colher de chá de bicarbonato de sódio
1/2 colher de chá de fermento em pó
1 colher de chá de sal
1/2 copo de óleo de coco
1/4 copo de manteiga derretida
3 ovos
1 copo de iogurte grego
1/2 copo de café
1 colher de chá de baunilha
1 copo de nozes partidas
1/2 copo de pepitas de chocolate negro
1/2 copo de pepitas de chocolate branco

Pré-aquecer o forno a 180ºC. Forrar as formas de muffins com formas de papel.
Numa tigela funda, misturar todos os ingredientes secos à excepção das pepitas de chocolate e às nozes.
Noutra tigela misturar os ingredientes líquidos.
Adicionar a mistura dos ingredientes líquidos nos secos e envolver bem. Misturar as pepitas de chocolate e as nozes.
Deitar porções iguais nas formas de muffins e levar ao forno durante 20 minutos. Ao fim desse tempo retirar do forno e deixar arrefecer numa rede.

NOTA:
Estes muffins podem ser congelados assim que arrefecerem. Assim têm sempre um bolinho delicioso para um lanche de última hora!


3 CHOCOLATE WITH WALNUTS MUFFINS

Preparation time: 40 minutes
Difficulty: Easy
Vegetarian: Yes
Suitable for children
Main Ingredient: Chocolate, Nuts
Makes 20 muffins
Dish: Cakes
Type of cuisine: Pastry

Ingredients:

2 cups all purpose flour
3/4 cup flour
1 cup of brown sugar
1/3 cup unsweetened cocoa powder
1 teaspoon baking soda
1/2 teaspoon baking powder
1 teaspoon salt
1/2 cup of coconut oil
1/4 cup melted butter
3 eggs
1 cup Greek yogurt
1/2 cup of coffee
1 teaspoon vanilla
1 cup walnuts chopped
1/2 cup dark chocolate chips
1/2 cup white chocolate chips

Preheat oven to 180ºC. Line muffin tins with paper liners.
In a deep bowl, mix all dry ingredients except for the chocolate chips and the walnuts.
In another bowl mix the liquid ingredients.
Add the mixture of liquid ingredients into dry and mix. Add the chocolate chips and walnuts.
Pour equal portions in the paper liners and bake for 20 minutes. At the end of this time remove from oven and cool on a rack.

NOTE:
These muffins can be frozen once cooled, so you always have a delicious treat for last minute snack!


07:00

Chávenas de chocolate / Chocolate cups

Chávenas de chocolate / Chocolate cups
Esta receita foi confeccionada de propósito para comemorar os terceiro aniversário do blog O Barriguinhas da querida Lucia. Se não conhecem o blog da Lucia, passem por lá e espreitem as receitas fabulosas que ela tem no cantinho dela! Cuidado que dá fome ver as fotos de tanta comida deliciosa!
Esta receita foi adaptada de uma receita da Nigella Lawson, que vi na TV há já algum tempo.
São deliciosos e o interior quente e cremoso liga mesmo muito bem com um bom gelado de baunilha como se vê nas fotografias. Mas passemos à receita e....

PARABÉNS "O BARRIGUINHAS"!!

This recipe was made ​​on purpose to celebrate the third anniversary of the dear Lucia's blog "O Barriguinhas". If you haven't seen this blog you should!! Caution this blog can make you hungry!
This recipe was adapted from a recipe of Nigella Lawson, that I saw on TV some time ago.
So delicious and the warm and creamy interior goes so well with a good vanilla ice cream. But let's carry on to the recipe and....

CONGRATULATIONS "O BARRIGUINHAS"!!


CHÁVENAS DE CHOCOLATE
Fonte - Nigella Lawson

Tempo de preparação: 30 minutos
Dificuldade: Fácil
Vegetariano: Sim
Apto para crianças
Ingrediente principal: Chocolate
Para 4 pessoas
Prato: Sobremesa

Ingredientes:
1/2 copo de chocolate negro partido
1/2 copo de manteiga
2 ovos
1/2 copo de açúcar
3 colheres de sopa de farinha
1 colher de chá de baunilha

Pré-aquecer o forno a 200ºC. Untam-se as chávenas com manteiga.
Derrete-se em banho maria ou no microndas o chocolate com a manteiga.
À parte batem-se os ovos com o açúcar, a farinha e a baunilha. Junta-se o chocolate derretido e envolve-se bem.
Distribui-se a massa pelas chávenas e leva-se ao forno durante 18 minutos. Ao fim desse tempo, retiram-se do forno e ficam a repousar durante 10 minutos.
Servem-se com uma bola de gelado de baunilha.


CUPS OF CHOCOLATE
Source - Nigella Lawson

Preparation time: 30 minutes
Difficulty: Easy
Vegetarian: Yes
Suitable for children
Main Ingredient: Chocolate
For 4 people
Course: Dessert

Ingredients:
1/2 cup dark chocolate chopped
1/2 cup butter
2 eggs
1/2 cup of sugar
3 tablespoons flour
1 teaspoon vanilla

Preheat oven to 200ºC. Grease the cups with butter.
Melt the chocolate and the butter in a water bath or microwave.
In a bowl beat the eggs with the sugar, flour and vanilla. Add the melted chocolate and mix.
Divide the batter between the cups bake for 18 minutes. At the end of this time, remove from the oven and let it rest for 10 minutes.
Serve with a scoop of vanilla ice cream.


13:32

Pães de leite / Milk bread

Pães de leite / Milk bread
Uma das memórias que eu tenho de criança, é o chegar a casa e sentir o cheiro a pães de leite acabadinhos de fazer em forno de lenha. Agora que eu tenho filhos, olho para eles e relembro-me das coisas que a minha mãe fazia por mim e pelo meu irmão. Nos anos 80 as coisas não foram fáceis, mas a minha mãe dava a volta à situação e nunca nos faltou nada na mesa. Fazíamos criação de animais, tínhamos uma horta grande o suficiente para produzir para nós e também para vender uma parte, a minha mãe fazia comida para fora e fazia crochet também para vender. Isto enquanto o meu pai estudava em Lisboa para subir na carreira e subir de posto na Marinha Portuguesa, para nos poder dar uma vida mais desafogada.
Mas apesar de tudo isto, a minha mãe tinha sempre um mimo à nossa espera e a nossa casa cheirava sempre a algo delicioso! Não era grande pasteleira, e lembro-me dela tirar bolos do forno e ficar furiosa por sairem mal e ameaçar atirar com tudo no lixo. Mas nós comiamos consolados, pois a nossa mãe tinha feito tudo aquilo por amor a nós.
Uma das coisas que me lembro melhor era das dezenas de bolos-rei que ambas fazíamos no Natal para depois congelar e comer durante o ano. O que eu me divertia a decorar os bolos! Mas a recordação que guardo com mais saudade era o cheiro de pães de leite que a minha mãe fazia.
Lembro-me de chegar a casa com colegas de escola, ou o meu irmão convidar os amigos para lanchar na nossa casa e a mesa enchia-se de pães de leite fofinhos e que cheiravam tão bem! E assim nós comíamos e víamos a minha mãe feliz nos fazer felizes com algo tão simples!
Infelizmente a minha mãe perdeu a receita quando mudámos para Lisboa e já não se lembra das quantidades dos ingredientes. Há já algum tempo que tento recriar os pães de leite que a minha mãe fazia e ontem consegui chegar ao resultado perfeito para mim! Deliciosos, fofinhos e com um cheirinho maravilhoso, tal como me lembro de quando era criança! Juro que quando provei os pães de leite, até me vieram as lágrimas aos olhos por ter conseguido. Acho que estou a ficar velha...


One of the memories I have as a child, is coming home and smell the milk bread fresh out of the wood oven. Now that I have children , I look at them and remind me of the things my mother did for me and my brother. In the '80s things weren't easy, but my mother could turn the situation around and we never lacked anything on the table. We breeded animals such as chicken, rabbits, turkeys, had a piece of land large enough to produce for us and also to sell a part, my mother used to make food to sell for restaurants and also made crochet to sell. This while my father studied in Lisbon to rise in rank in the Portuguese Navy, to be able to give us a more comfortable life.
But despite all this, my mother always had a treat waiting for us and our house always smelled like something delicious! She wasn't a great baker, and I remember her taking cakes from the oven and be furious because it turned out bad and threatening to throw everything in the garbage. But we ate comforted, because our mother had done everything for love.
One of the things I remember best was the dozens of king-cakes we both did at Christmas and then freeze and eat during the year. I really enjoyed decorating the cakes! But the memory I keep with more longing was the smell of milk bread my mom used to make.
I remember coming home with schoolmates, or my brother would invite friends for a afternoon snack at our home and the table was filled up with fluffy milk breads and they smelled so good! And so we would eat and see my mother happy for making us happy with something so simple!
Unfortunately my mother lost the recipe when we moved to Lisbon and she doesn't remember the quantities of the ingredients. For some time now that I try to recreate the milk bread my mom used to make, and yesterday I managed to get the perfect result for me! Delicious, fluffy and with a wonderful smell as I remember when I was a child! I swear that when I tasted the milk bread it made tears to my eyes for being able to achieve my goal. I think I may be getting old...


PÃES DE LEITE

Tempo de preparação: 2 horas
Dificuldade: Fácil
Vegetariano: Sim
Apto para crianças
Ingrediente principal: Farinha, leite
Rende 8 pães de leite
Prato: Lanche
Tipo de cozinha: Pastelaria

Ingredientes:
500g de farinha
200g de leite morno
60g de açúcar
2 ovos
25g de fermento fresco
60g de manteiga à temperatura ambiente
1 ovo para pincelar


Dissolver o fermento na leite e misturar todos os ingredientes na tigela de uma batedeira, à excepção da manteiga. Quando os ingredientes estiverem todos bem incorporados e juntar a manteiga e bater mais um pouco até a manteiga ficar bem incorporada na massa.
Polvilhar a bancada de trabalho com farinha e amassar a massa à mão até a massa se descolar das mãos. Colocar num alguidar polvilhado com farinha, tapar com um pano e deixar levedar durante cerca de 1 hora ou até dobrar o volume.
Dividir a massa em várias porções (eu dividi em 8 porções) e fazer bolinhas. Espalmar as bolas de massa até se obter um círculo, dobrar um lado até ao centro do círculo e pressionar. Pegar no outro lado e dobrar até ao centro e beliscar a massa para ficar colada, de forma a ficar com um cilindro. Viram-se ao contrário e colocam-se os pães de leite num tabuleiro forrado com papel vegetal. Deixam-se levedar durante 40 minutos. Ao fim desse tempo fazem-se cortes com uma tesoura de cozinha na parte superior dos pães de leite, pincelam-se com ovo batido e levam-se ao forno pré-aquecido a 180ºC durante 15 minutos ou até ficarem dourados. Quando se bater no pão de leite e este fizer um som oco é porque está cozido e pode ser retirado do forno.

NOTA:
Depois de arrefecerem, estes pães de leite podem ser congelados para se ter durante toda a semana  para pequenos almoços e para os lanches da escola.


MILK BREADS

Preparation time: 2 hours
Difficulty: Easy
Vegetarian: Yes
Fit for kids
Main ingredient: Flour, milk
Yields 8 milk breads
Dish: Snack
Type of cuisine: Bakery

Ingredients:
500 g of all purpose flour
200 g warm milk
60 g of sugar
2 eggs
25 g fresh yeast
60 g of butter at room temperature
1 egg to brush


Dissolve the yeast in the milk and mix all the ingredients in the bowl of an electric mixer, with the exception of the butter. When the ingredients are all well incorporated and add butter and beat another minute.
Sprinkle the worktop with flour and knead the dough by hand until the dough comes off the hands. Place in a bowl sprinkled with flour, cover with a cloth and let rise for about 1 hour or until doubled in volume.
Divide the dough into several portions (I divided it into 8 portions) and make small balls. Flatten the dough balls to a circle, fold one side to the center of the circle and press. Get on the other side and fold to the center and pinch the dough to be glued, in order to get a cylinder. Turn upside down and place the milk breads on a tray lined with parchment paper. Let rise for 40 minutes. At the end of this time make cuts with scissors, brush with egg and bake in a preheated oven at 180ºC for 15 minutes or until golden brown. When you hit the milk bread and this makes a hollow sound is because it's cooked and can be removed from the oven.

NOTE:
After cool, these milk breads can be frozen to kave it for breakfast and school during all week.


23:03

Pães fofinhos integrais / Fluffy wholewheat buns

Pães fofinhos integrais / Fluffy wholewheat buns
Estes pães são resultado de diversas tentativas para chegar a um pão leve, fofinho e, acima de tudo saudável. Hoje voltei a tentar fazer estes pães e o resultado foi fantástico! Os meus filhos adoraram! São tão fofinhos e a massa não é seca e pesada, como às vezes acontece quando se usa farinha integral. E não são difíceis de fazer, requerem é um pouco de paciência.
Os meus filhos dizem que estes são, sem sombra de dúvida, os pães mais fofinhos e saborosos que já comeram! Muito melhores do que os de compra!
São uma opção bem mais saudável para o lanche das crianças!
Agora queria referir um ponto, eu, nesta receita, uso xarope de agave. Caso não o tenham podem usar mel, como já usei noutras versões, mas o mel tem um sabor mais acentuado que, para mim, não resulta tão bem no pão que eu queria obter. Eu uso também azeite, mas convém ser um azeite com um sabor mais suave.

These buns are a result of several attempts to reach a light, fluffy and above all healthy bread. Today I tried again to make these buns and the result was fantastic! My kids loved it! They are so fluffy and the dough it's not dry and heavy, as sometimes happens when using wholemeal flour. And it is not difficult to make, just requires a little patience.
My kids say these are, without a doubt, the fluffy and tastiest bread they they have ever eaten! Much better than the bought ones!
This is a much healthier option for the children's school snacks!
Now I wanted to mention one point, in this recipe, I use agave syrup. If you don't have it you can use honey, as I already used in other versions of this bread, but honey has a stronger flavor that, to me, does not work so well in the bread that I wanted to get. I also use olive oil, but it should be an oil with a milder flavor.


PÃES FOFINHOS INTEGRAIS

Tempo de preparação: 1h30m + 15 m
Dificuldade: Médio
Vegetariano: Sim
Apto para crianças
Ingrediente principal: Farinha integral, xarope de agave, azeite
Rende 8 pães
Prato: Pão

Ingredientes:
2 copos + 4 colheres de sopa de farinha integral
2 copos de farinha sem fermento
25g de fermento fresco
1/4 copo de xarope de agave
1 pitada de flor de sal
1 1/2 copo de água tépida
1/3 copo de azeite
1 ovo pequeno

Colocar na tigela do robot de cozinha, 1 copo de farinha integral, 1 copo de farinha sem fermento, o agave, o sal e a levedura dissolvida na água tépida. Amassar até se obter uma massa homogénea. Sem parar de amassar, juntar o ovo batido e o azeite.
Quando o ovo e a azeite estiverem incorporados na massa, juntar a pouco e pouco a restante farinha, até esta ficar incorporada.
Polvilhar a bancada de trabalho com farinha e amassar à mão a massa até a massa se despegar das mãos. Juntar mais farinha se for necessário. É suposto a massa ficar muito macia. Não se deve amassar demais, para o pão não ficar duro e pesado.
Colocar a massa num alguidar polvilhado com farinha e deixar levedar durante 1 hora num local quente e livre de correntes de ar.
Ao fim desse tempo amassar a massa e moldar bolinhas do tamanho que se desejar. Colocar num tabuleiro polvilhado com farinha e deixar repousar cerca de 30 minutos.
Levar ao forno pré-aquecido a 180ºC durante 15 minutos. Quando se bater no pão e fizer um som oco, é porque o pão está cozido.


FLUFFY WHOLEWHEAT BUNS

Prep Time: 1h30m + 15 m
Difficulty: Medium
Vegetarian: Yes
Suitable for children
Main Ingredient: Whole flour, agave syrup, olive oil
Makes 8 buns
Dish: Bread

Ingredients:
2 cups + 4 tablespoons wholewheat flour
2 cups all purpose flour
25g fresh yeast
1/4 cup agave syrup
1 pinch of Fleur de salt
1 1/2 glass of warm water
1/3 cup olive oil
1 small egg

Place in a mixer bowl, 1 cup wholewheat flour, 1 cup all purpose flour, agave, salt and the yeast dissolved in warm water. Knead until the dough has no lumps. While kneadding, add the beaten egg and olive oil.
When the egg and olive oil are incorporated into the dough, add little by little the rest of the flour until it is incorporated.
Sprinkle work surface with flour and knead the dough by hand until the dough doesn't stick to your hands. Add more flour if necessary. It's supposed to be a very soft dough. It shouldn't knead to much, so the bread does not get tough and heavy.
Place the dough in a bowl dusted with flour and let rise for 1 hour in a warm place, free from drafts.
At the end of that time knead the dough and make balls the size that you desire. Place on a tray dusted with flour and let stand about 30 minutes.
Bake in a preheated oven at 180°C for 15 minutes. When you hit the bread and it makes a hollow sound, it's because the bread is baked.


Copyright © 2016 As coisas da Mãe Sofia , Blogger